Unity 複数のpngファイルをまとめて1つのファイルとして出力する
概要
1つの画像を複数の画像に分割保存する方法などは調べると結構出てきたのですが、逆に結合する方法はあまり出てこなかったのでまとめてみました。
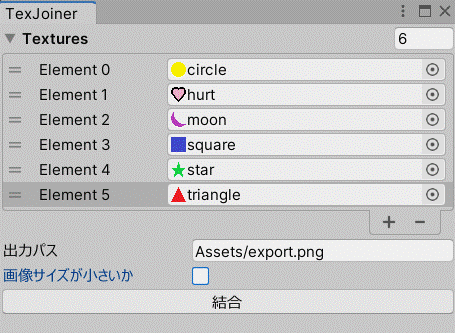
一応分割する方法の記事も作成しましたので、こちらもよろしくお願いします。
kiironomidori.hatenablog.com
使用するスクリプト
- ウィンドウから操作できるように「EditorWindow」を継承しました。
- プログラムは割とゴリ押し的なものであまりスマートではありません。
using System.Collections.Generic;
using UnityEngine;
using System.IO;
using UnityEditor;

public class TexJoiner : EditorWindow
{
    //ウィンドウの生成
    [MenuItem("エディタ拡張/画像結合")]
    static void Init()
    {
        TexJoiner window = (TexJoiner)GetWindow(typeof(TexJoiner));
        window.Show();
    }


    [SerializeField] List<Texture2D> textures;
    [SerializeField] string filePath = "Assets/export.png";
    private void OnGUI()
    {
        var so = new SerializedObject(this);
        so.Update();

        //Textureを取得
        SerializedProperty texProp = so.FindProperty("textures");
        EditorGUILayout.PropertyField(texProp);

        //ボタンを押してPNGファイルを作成
        if (textures != null)
        {
            filePath = EditorGUILayout.TextField("出力パス", filePath);

            if (GUILayout.Button("結合"))
            {
                Texture2D tex = SetTexture();
                ConvertTextureToPng(tex);
            }
        }

        so.ApplyModifiedProperties();
    }

    Texture2D SetTexture()
    {
        //各画像の幅と高さ
        int eachWidth = textures[0].width;
        int eachHeight = textures[0].height;

        //縦、横に何枚画像を並べるか選択
        int col = Mathf.CeilToInt(Mathf.Sqrt(textures.Count));
        int row = 1;
        for (int i = col; i > 0; i--)
        {
            if (col * i < textures.Count)
            {
                row = i + 1;
                break;
            }
        }

        //目的となるTexture2Dの作成
        Texture2D dst = new Texture2D(eachWidth * col, eachHeight * row);
        for (int i = 0; i < row; i++)
            for (int j = 0; j < col; j++)
            {
                for (int k = 0; k < eachHeight; k++)
                {
                    //操作するSpriteのTextureを取得
                    Texture2D partTex = null;
                    if (i * col + j < textures.Count)
                    {
                        partTex = textures[i * col + j];
                    }


                    for (int l = 0; l < eachWidth; l++)
                    {
                        Color color;
                        if (partTex != null)
                        {
                            color = partTex.GetPixel(l, eachHeight - 1 - k);
                        }
                        else
                        {
                            color = new Color(0, 0, 0, 0);
                        }

                        //dstのx座標とy座標の決定
                        int x = j * eachWidth + l;
                        int y = dst.height - (1 + i * eachHeight + k);
                        dst.SetPixel(x, y, color);
                    }
                }
            }
        return dst;
    }

    void ConvertTextureToPng(Texture2D tex)
    {
        byte[] pngData = tex.EncodeToPNG();
        File.WriteAllBytes(filePath, pngData);
    }
}
使用例
①. 高さ・幅がともに等しい画像を複数枚用意します。ここでは、高さ・幅がともに100ピクセルの画像を6枚用いました。

②. エディタ上で「エディタ拡張」⇒「画像結合」の順に選択してEditorWindowを表示する。

③.Texturesに画像を追加して、出力パスを決定してから「結合」ボタンを押す。また、今回は100×100の画像なので問題ないが、サイズの小さな画像を使うと画像にノイズが乗ってしまう場合がある。その場合は「画像サイズが小さいか」にチェックを入れる。

④. 今回の例では「Assets」フォルダに次のような画像(export.png)が出力されます。実行後に画像が表示されていない場合はタブから、「Assets」⇒「Reflesh」(ショートカットキー:Ctrl+R)を押すと出てくると思います。
