関連記事
複数のpngファイルを1枚に並べて保存する方法について
使用するスクリプト
- ウィンドウから操作できるように「EditorWindow」を継承しました。
using UnityEngine;
using System.IO;
using UnityEditor;

public class TexSpliter : EditorWindow
{
    //ウィンドウの生成
    [MenuItem("エディタ拡張/画像分割")]
    static void Init()
    {
        TexSpliter window = (TexSpliter)GetWindow(typeof(TexSpliter));
        window.Show();
    }


    [SerializeField] Texture2D src;
    [SerializeField] int row = 1;
    [SerializeField] int col = 1;
    [SerializeField] string exportFolder = "Assets";

    private void OnGUI()
    {
        var so = new SerializedObject(this);
        so.Update();

        //Textureを取得
        src = (Texture2D)EditorGUILayout.ObjectField("画像", src, typeof(Texture2D), false);

        if (src != null)
        {
            row = EditorGUILayout.IntField("行数", row);
            col = EditorGUILayout.IntField("列数", col);
            exportFolder = EditorGUILayout.TextField("出力先フォルダ", exportFolder);

            if (GUILayout.Button("分割"))
            {
                ChangeTexSetting();
                SplitTexture();
            }
        }

        so.ApplyModifiedProperties();
    }

    //設定の変更
    void ChangeTexSetting()
    {
        //パスからテクスチャーインポートの取得
        string path = AssetDatabase.GetAssetPath(src);
        TextureImporter tI = AssetImporter.GetAtPath(path) as TextureImporter;

        //読み取り可能にする
        tI.isReadable = true;

        //設定を適用
        AssetDatabase.ImportAsset(path, ImportAssetOptions.ForceUpdate);
    }

    void SplitTexture()
    {
        //各画像の幅と高さ
        int eachWidth = src.width / col;
        int eachHeight = src.height / row;


        //目的となるTexture2Dの作成
        for (int i = 0; i < row; i++)
            for (int j = 0; j < col; j++)
            {
                Texture2D dst = new Texture2D(eachWidth, eachHeight);
                for (int k = 0; k < eachHeight; k++)
                {
                    for (int l = 0; l < eachWidth; l++)
                    {
                        //srcのx座標とy座標の決定
                        int x = j * eachWidth + l;
                        int y = src.height - (1 + i * eachHeight + k);
                        Color color = src.GetPixel(x, y);

                        dst.SetPixel(l, eachHeight - 1 - k, color);
                    }
                }

                //dstを出力する
                byte[] pngData = dst.EncodeToPNG();
                string filePath = $"{exportFolder}/{src.name}_{i * col + j}.png";
                File.WriteAllBytes(filePath, pngData);
            }
    }
}
使用例
①. pngファイルを用意

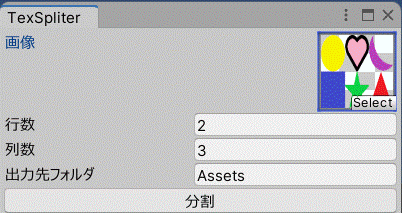
②. エディタ上で「エディタ拡張」⇒「画像分割」と選び、編集用のウィンドウを表示。

③.Textures、分割数、出力パスを決定してから「分割」ボタンを押す。
④. 今回の例では「Assets」フォルダに次のような画像が出力されます。実行後に画像が表示されていない場合は、「Assets」⇒「Reflesh」(ショートカットキー:Ctrl+R)を押すと出てくると思います。
